6 Steps to Sump Pump Installation
Dealing with a wet basement can be a homeowner’s nightmare.
The presence of moisture not only damages your property but can also lead to mold growth, which is hazardous to your health.
While addressing this issue might seem daunting, installing a sump pump can be a significant step toward a drier, healthier basement.
However, it’s crucial to understand that a sump pump alone is not a silver bullet.
For comprehensive basement waterproofing, it should be part of a full home system, including interior drainage, wall vapor barriers, and a dehumidifier.
What is a Sump Pump & Why is it Important?
A sump pump is an essential component of your home’s waterproofing strategy. It’s installed in the lowest part of the basement.
Its primary function is to collect and pump out groundwater that accumulates around the foundation, preventing water from flooding the interior spaces and safeguarding against moisture-related issues such as mold and foundation damage.
Here are three key benefits:
1. Prevents Flooding
By removing water that accumulates in the sump basin, it prevents basement flooding.
2. Reduces Mold and Mildew
By keeping the basement dry, it inhibits mold and mildew growth.
3. Protects the foundation
By managing the water level around your home, it helps prevent structural damage to your foundation.
Sump Pump Installation Guide
While DIY projects can be rewarding, installing a sump pump requires precision and understanding of your home’s foundation.
Here’s an overview of what professional installation involves:

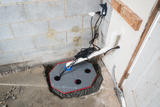
Step 1: Excavation
A pit of at least 18 inches in diameter and 24 inches deep is excavated in the lowest part of the basement.
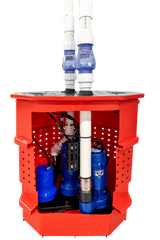
Step 2: Sump Liner Installation
A sump liner is placed in the pit, surrounded by a layer of gravel to ensure proper drainage.
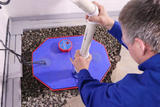
Step 3: Pump Installation
The sump pump is installed in the liner, and the discharge pipe is securely connected.

Step 4: Install and Connect Perimeter Drainage
The perimeter of the basement is excavated to create trenches for installing interior drains, which are then linked to the sump pump system.
Step 5: Check Valve Installation
A check valve is installed on the discharge pipe to prevent backflow into the sump pit.
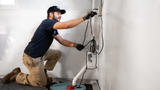
Step 6: Electrical Connection
The sump pump is connected to a power source and thoroughly tested.
Following these steps ensures that your sump pump is installed correctly, providing effective water management and peace of mind.
Professional installation not only guarantees that the system works efficiently but also prevents potential issues that could arise from incorrect setup, such as water backup or pump failure.
Sump Pump Maintenance Guide
Regular maintenance is vital to ensure your sump pump’s efficiency.
Here are key steps to include:
- Check the pump and pit for debris.
- Test the pump by pouring water into the pit.
- Inspect and clean the check valve.
- Ensure the discharge line is clear and free of obstructions.
- Review battery backup and power supply systems.
Contact Foundation Systems of Michigan for Professional Sump Pump Installation

While a DIY approach may be tempting, the installation of a sump pump involves complexities best handled by professionals.
Foundation Systems of Michigan can ensure that your sump pump is installed correctly and integrating seamlessly with your home’s waterproofing system. DIY attempts can often lead to poor installation or overlooked aspects like proper discharge placement and backflow prevention.
By choosing professional installation, you avoid these pitfalls and ensure that your system is reliable.
Imagine the peace of mind you’ll experience knowing that the next time it rains, your basement will remain dry and comfortable.
By investing in professional sump pump installation with FSM, you’re not just protecting your property; you’re ensuring a healthier living environment for your family.
FAQs
A battery backup sump pump is a secondary pump that operates during power outages or if the primary pump fails. It’s highly recommended for homes to have this protection, especially in areas prone to heavy rains or those with histories of power outages during storms.
The right size depends on several factors, including the size of your basement, the average rainfall in your area, and the water table level. A professional can assess your specific needs and recommend the appropriate pump size and capacity.
If your sump pump fails, check for common issues like clogs, stuck switches, or power supply problems. If these troubleshooting steps don’t resolve the issue, contact a professional for repair or replacement.
Leah Leitow
Publish Date:
Last Modified Date:

Our Locations
32985 Schoolcraft Road
Livonia, MI 48150
5985 Clay Avenue SW
Grand Rapids, MI 49548
2817 Bond St.
Rochester Hills, MI 48309
5555 Airport Hwy
Toledo, OH 43615
3805 Elmers Industrial Drive
Traverse City, MI 49685